|
Placement
On the back of the diesel pump (toward the passenger compartment).
Function
The maximum quantity regulator (aneroid) shall regulate the fuel quantity according to how much
air the turbo pushes in. With the turbo and without this regulator, the pump had to be adjusted
so that the engine received too much diesel at low revs (black exhaust) and too little at high
revs (too little power in the engine).
Method of operation
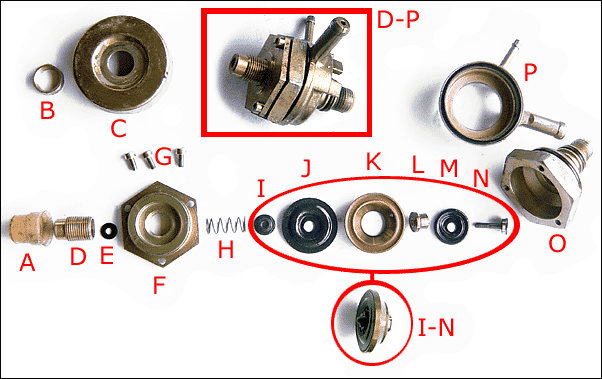
When the turbo pressure increases, the diaphragms (J and M) are pushed out so that the pump lets more
diesel through. You can regulate how much extra is allowed through with the adjusting screw (D).
Adjustment
Adjusting D can be difficult, but as a starting point you can have it screwed in 4 - 5 turns.
If you turn it too far in, you won't get started. If you screw out
too far, D, E and H will fall out, and M may also break.
|
|
Max quantity regulator

In addition to what is shown in the picture, there is a small tab inside O. (When you insert it, the thin end should face you.)
Dismantling
- Remove the cable, loosen the two screws (13mm) that hold the diesel filter, lift it up and carefully place it next to the spare wheel.
- Remove the bracket on which the diesel filter was attached (two screws; use a ratchet with an extension).
- Place something that can collect diesel spills and things you drop. (You can, for example, cut off the bottom of a plastic cage.)
- Remove the two hoses on the regulator.
- Pry off cover A with a flat screwdriver.
- Insert an Allen key (4mm) in D and unscrew B with a spanner (14mm).
Let B and C slide down on the Allen key. (Make sure D stays in the same position!)
- Unscrew D-P. (Perhaps sitting hard: Watch your knuckles.)
- Unscrew D with a 4mm Allen key while counting the number of turns, write it down in your repair/maintenance book,
and screw it back in (be careful not to lose E and H).
- Remove P, and unscrew 3xG. (First use a pair of pliers to loosen them, then a 2.5mm Allen key.)
- Remove F, be careful not to lose E and H.
- Take out I-N. Check that the two diaphragms (J and M) are intact.
If you have to change the membranes, use two 8mm spanners. Make sure you put the new membranes
in the right way. You will see that they have grooves that fit into K.
- Insert a pin into the end of O and check that the small pin inside can slide back and forth.
- Check all O-rings for cracks and apply a thin layer of grease.
Assembly
- Screw in D-P. Make sure that the nipple (P) that the air hose goes into is pointing straight up.
- Put B and C onto the Allen key and place it in D. Thread C and screw B.
- Put on cover A.
- Put on the hoses.
- Fit the bracket, put the diesel filter in place, screw it in and put on the wire.
- Start the engine and check that there are no leaks anywhere.
|
|
|
Problem
If there is a crack in membrane M, it will pass through diesel so
that it enters the air hose. This, in turn, could cause the engine to rev up without
you giving it gas, especially at idle. (Until you fix the leak, you should park with the front uphill.)
If there is a crack in membrane J, the air will leak out.
If there is a crack in both, there will also be a diesel leak, and the engine will run like a threshing machine.
Diesel leakage can also occur if the O-rings are dry or cracked. Apply a thin layer of grease.
• F-O can be purchased as a complete part from e.g. CX-Basis (EAD-13766), or you can buy the diaphragms from a diesel pump supplier.
|
|

