Home
Electrics
SWITCHES
Norsk

The light switch have all the power to the lights going through them, and can therefore get hot and melt. For this reason, it is good practice to connect relays on the lamps.


1Housing assy
3Lighting switch
4Contact switch
8Tapping screw
9Speed nut
Lysbrytar
The drawing is borrowed from the Citroën CX' parts list


  Be very careful when disassembling.

Lysbrytar


   Check if the spring loaded staples A can slide easily in and out, and if the feathers can move freely. If the switch has been hot/melted the sleeves they sit in can be a little deformed. If so try carefully to open them up a little with a small drill. Check if the contact surfaces B of the staples have melted down into the plastic. If they've done so, you can try to get them back up again with a soldering iron (NOT easy!).
  Also, check that C can glide easily.
  Clean and put on acid-free grease.


• Get a spare switch and keep it in the car. Important: Make sure it is working properly.
  You can also make an "emergency light switch".

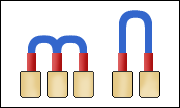
«Emergency light switch»

Make these wires to get low beam:

  1. Two connected wires with flat lugs to short circuit 1, 2 and 3.
  2. One wire with flat lugs at both ends to short circuit 4 and 6.
Ledninger
Nødbrytar

This is what you see when you remove the switch.

  • Blue = parking light
  • Green = low beam
  • Red = high beam

(5 and 6 are being short circuited by the high beam flash switch)                                                                    

Tips

Make the wiring, print out this page, put everything into a small plastic bag, and put it in the glove compartment. Feel free to also put it in a small screwdriver.


Opp

Valid XHTML 1.0 Transitional