• The hand brakes work on the front wheels.
• Adjustment is done on the callipers.
|
|
|
Handbrakes
Much negative has been said about the handbrakes (yes, there are actually two;) on the CX, and everything wrong.
So long as you give them proper maintenance, there are no more efficient hand brakes on any car.
Have a look at what Autocar wrote in 1978:
The remarkably effective handbrake operates on the front wheels.
It managed an almost unbeatable 0.42g deceleration and easily held the CX Pallas C-Matic on a 1 in 3 slope,
from which a restart could be made with contemptuous ease.
And remember that the hand brakes also function as emergency brakes.
The handbrakes must be adjusted and greased often.
Minimum every spring and autumn, otherwise you end up with two immovable rust lumps.
It is also important to use them from time to time.
|
|
|
| 1 | Handbrake lever |
| 2 | Control lever |
| 3 | Spacer |
| 4 | Adjustmnt screw |
| 5 | Contact switch |
| 6 | Capscrew |
| 7 | Capscrew |
| 8 | Plain washer |
| 9 | Hexagonal nut |
|
|
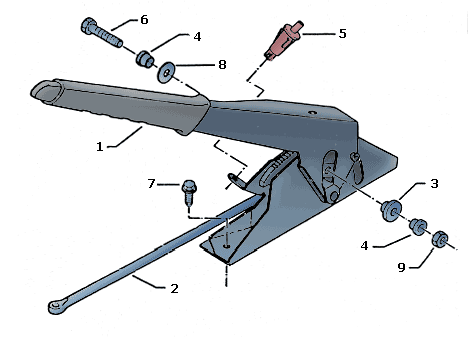 The drawing is borrowed from the Citroën CX' parts list
|
|
|
| 1 | Handbrake cable |
| 2 | Handbrake lever |
| 3 | Set 4 brake pad |
| 4 | Hdbrk equalizer |
| 5 | Cable ring |
| 6 | Hndbrk spindle |
| 7 | Hndbrk spindle |
| 8 | Pin |
| 9 | Return spring |
| 10 | Cup |
|
|
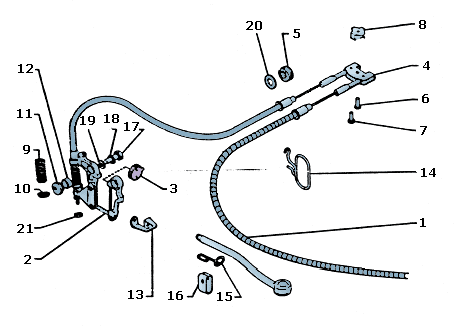 The drawing is borrowed from the Citroën CX' parts list
|
|
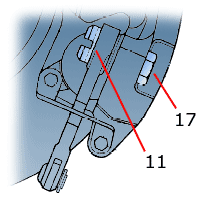
| 11 | Eccentric |
| 12 | Handbrak spacer |
| 13 | Lever stop |
| 14 | Cable guide |
| 15 | Cable guide |
| 16 | Adjust collar |
| 17 | Capscrew |
| 18 | Washer |
| 19 | Plain washer |
| 20 | Plain washer |
| 21 | Plain washer |
|
|
Adjusting
If the brake disks are getting thin, it will be difficult to get the hand brakes tight enough.
If so, replace the brake disks. (The brake disks shall be minimum 18 mm thick.)
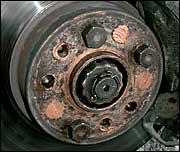 NB! The brake disk must be immobilized with three wheel bolts. If you use bolts for aluminum wheels: Put on 13mm spacers (nuts).
To adjust 4x 11 you can use a large flat screwdriver or
a square awl where the outer tip is removed. Or make yourself a special tool of 4.5 mm thick metal:

|
|
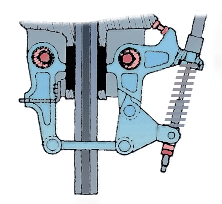
The drawing is borrowed from the Citroën CX' service manual
- Jack up the front of the car, put it on stands, take off the road wheels and put the gear stick in neutral.
- The hand brakes must be disengaged.
- Unscrew the lock nut and the adjustment nut on the wire both sides (2 11mm wrenches + small
spanner
to hold the end of the wire).
- Loosen 4x17 (17mm).
- Adjust 4x11 (clockwise seen from behind) and
tighten 4x 17, first at the outside, then on the inside. (4x 11 must be tightened/turned just so much that you can easily rotate
the brake disc with your hands with a little resistance. Be sure not to touch the surface of the brake disc, hold onto the edge.)
- Pull out the wire first on one side, and then on the other side. Measure the difference and screw
back on the adjustment nut and lock nut on both sides. (If the end sticking out on the left
side was 5 mm longer than the one on the right, it shall still be sticking out 5 mm more wire on the left side.)
- Test that you can turn the brake disks around with your hands, and that they (the brake disks;) are completely clean.
On alloy wheels the end of the wire might hit the rim. If so you can
try to shorten the small set screw
slightly (2 8mm wrenches) and realign. If that does not work either, you can pull out the wire
and put on a few washers or a nut or similar.
|
|
Tighten 4x17 7.5 mdaN (75 Nm).
Tighten the lock nut 1.5 mdaN (15 Nm).
Click on the picture for a closer look.
Put grease on the wire and pull a plastic hose onto it so that the hose will remain under the trigger guard.
|
|
Problem
The warning light for engaged hand brake is on when it should not.
|
|
|

This usually is because the switch (5) will not be pushed far enough down. Cut and put on a piece of filt
(meant to be put under chair feet's).
|
|
|
|
|
In winter, you should avoid having the hand brakes on for an extended period of time, in case they
freeze. Park flat (transversely in a hill), and have the car in reverse or in 1st
gear. Let go of the brake pedal and wait until the car has settled (may
roll a little bit forward or backward) before you switch of the engine and let go of the clutch.
If you cannot park transversely in a hill, turn the front wheels:
Turn the steering wheel all the way over, and hold it there while you switch of the engine and take out the
key. Then gently let go of the steering wheel to engage the steering wheel lock. When you put the key in
the ignition again, it is important to twist / pry a little on the steering wheel so you don't break off the
key.
|
|
|
• Downhill: 1th gear.
• Uphill: Reverse.
|
|


|

