Replacing the windscreen
You need
- Windscreen
- Windscreen wiper
Plus
- Degreaser
- Paint polish
- Paint sealant
- Silicon pin
- Manual dishwashing liquid
- String
|
|
- Cover the hood with a blanket or similar.
- Release the windscreen wiper nut and turn the wiper over to the hood.
- Pull out the strip that is pushed into the rubber gasket.
- Remove the plastic covers on the the A-pillars (inside).
- Cover the dashboard; the ventilation openings in particular.
- Heat the gasket inside the car with a hairdryer keeping it in constant movement.
- Get a helper and set your feet on the upper part of the windscreen and press it gently out.
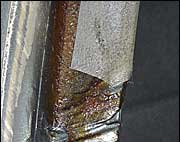
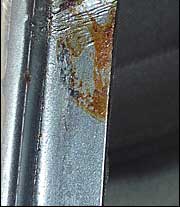
- Fix evt. rust.
- Clean with degreaser on a cloth.
- Polish.
- Put on car paint sealant.
- Vacuum the inside of the rubber gasket where the windscreen has been, and then press in a paper towel and drag it all the way around.
- Make sure that the two drainage holes in the rubber gasket are open (down at the corners).
- Use a silicon pin (the type you use on the rubber sealings) and add to the seal on the interior side.
- Heat the rubber gasket (let it f.ex. lie in the sun for a while).
- Put the rubber gasket on the new windscreen (start at the bottom).
- Put manual dishwashing liquid on the interior side of the rubber gasket.
- Take a strong string, insert it with manual dishwashing liquid and put it into the rubber gasket.
(Note: In the bottommost slot, not the draining track!) The string can be placed in various ways,
the factory ended the operation down at the middle. The way I have done it is to start at 2 o'clock and lead the string
clockwise one full revolution, and then to 10 o'clock.
- Get a helper and put the windscreen into place. Make sure that it don't slide down.
- While the helper pushes gently on the outside, pull the rubber gasket in place inside the cabin (with the string).
Start at 10 o'clock and go to 2 o'clock. Then take the string there and go to 10 o'clock. Then continue to pull both ends of the string.
- Press the strip into the rubber gasket again (this takes time, is a little awkward).
- Clean the windscreen thoroughly on both sides.
- Put back the plastic covers on the A-pillars.
- Switch to new windscreen wiper, put it back on the windscreen, and tighten the nut.
- Put the mirror over to the new windscreen (pull it upwards to get it loose).
|
|
|
• You can order a new windscreen at the closest repair center (in Norway). It will be there within a day or two.
(Make sure it has got the correct hue.)
• If the windscreen cracks when you take it out it will come full of small glass pieces into the passenger compartment.
To avoid it, tape on plastic on the inside of the windscreen.
• Use new assembly gloves when handling the windscreen.
 Almost at the top of each A-pillar there is a groove that you should fill with putty, so you don't get whistling sounds at a later date.
|
|